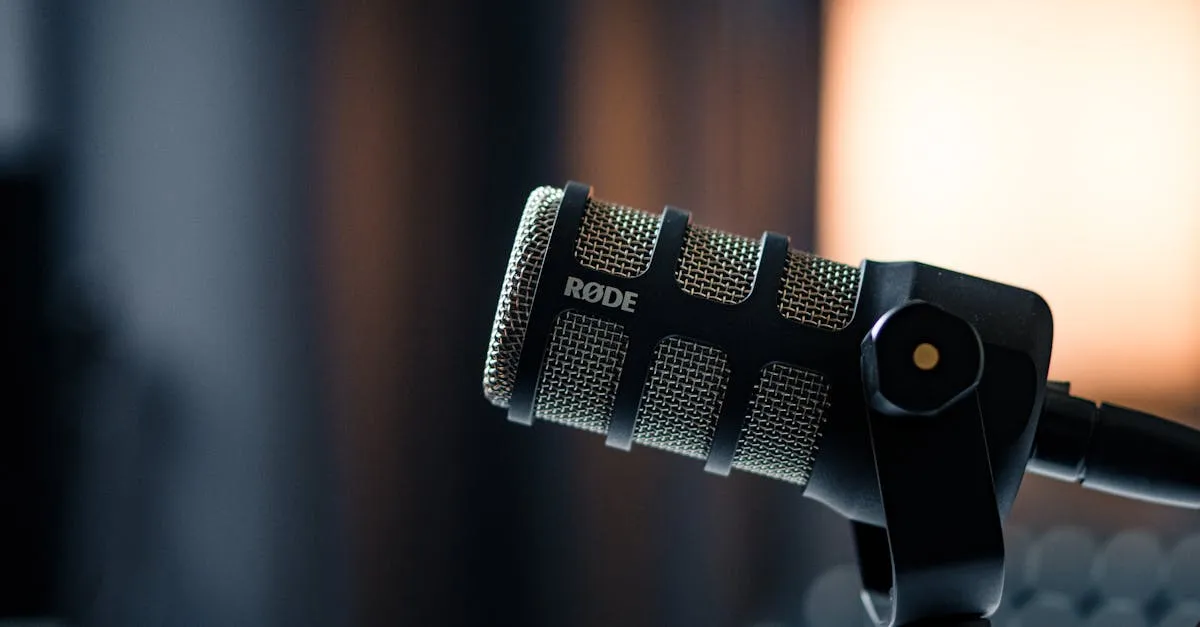
Rode PodMic USB Review (2026): Broadcast Quality for Course Creators
I’ve tested a lot of microphones for recording online course content. Most of them fall into one of two camps: cheap and tinny, or expensive and overkill. The Rode PodMic USB sits in a sweet spot that’s hard to ignore — broadcast-quality sound, solid metal construction, and built-in DSP processing that saves you from post-production headaches.
After weeks of using this mic for course recordings, live sessions, and voiceover work, here’s my full take.
What You Get
The Rode PodMic USB is a dynamic microphone with dual connectivity — USB-C for plug-and-play simplicity and XLR for when you want to upgrade to a professional audio interface later. It records at 24-bit/48kHz resolution, which is more than enough for any course platform or podcast.
In the box, you get the microphone itself with an integrated swing mount, a USB-C cable, and a thread adapter. No shock mount to buy separately, no external pop filter needed — the internal pop filter handles plosives well enough for most voices.
Build Quality
This thing is built like a tank. The all-metal construction weighs in at roughly 1.8 pounds, and it feels like it could survive a drop from your desk without a scratch. Rode didn’t cut corners here. The finish is a matte black powder coat that resists fingerprints and looks professional on camera.
The integrated swing mount is a nice touch — it’s permanently attached and lets you position the mic at almost any angle. No fumbling with separate mounting hardware.
But that weight is a double-edged sword. At 1.8 lbs, the Rode PodMic USB needs a sturdy boom arm. If you’re using a cheap desk stand or a lightweight arm rated for condenser mics, it will sag or tip. Plan to pair this with a heavy-duty boom arm like the Rode PSA1 or equivalent.
Sound Quality
This is where the Rode PodMic USB earns its keep. Out of the box, with no processing applied, it delivers that warm, present broadcast tone that makes your voice sound authoritative and clear. The dynamic capsule naturally rejects room noise, which is a huge advantage if you’re recording in an untreated room (and let’s be honest, most course creators are).
Compared to condenser mics in the same price range, the PodMic USB picks up far less background noise — no air conditioning hum, no keyboard clicks, no echo from bare walls. You speak close to the grill (2–4 inches), and the proximity effect adds a natural fullness to your voice that sounds professional without any EQ trickery.
I tested it against my usual recording setup, and the difference was immediate. Course audio that used to require noise reduction and EQ in post now sounds polished straight from the mic.
The Standout Feature: Built-In DSP
Here’s what sets this mic apart from almost everything else at this price: onboard DSP processing.
Through the Rode Central or Rode Unify companion apps, you can apply a noise gate, compressor, and EQ directly on the microphone’s hardware. That means the processing happens before the audio even hits your computer. Your recordings come out sounding polished with zero post-production.
Let me break down what each effect does in practice:
- Noise gate — Cuts the mic when you’re not speaking. No more dead air filled with room tone. Set the threshold, and silence is actually silent.
- Compressor — Evens out your volume. If you tend to get loud when you’re excited about a topic (guilty), the compressor keeps your levels consistent so listeners don’t have to ride the volume knob.
- EQ — Shape your tone at the source. A little high-pass filtering to clean up low-end rumble, a slight presence boost for clarity. Done.
Once you dial in your settings, they stay on the mic. You can disconnect the app and the DSP processing persists. This is a massive time-saver if you’re recording course lessons in batches and don’t want to process each file afterward.
If you want to see how it compares to other mics in this category, check out my Best Microphones for Online Courses roundup.
Zero-Latency Headphone Monitoring
The built-in 3.5mm headphone jack provides zero-latency monitoring, which means you hear yourself in real time with no delay. This matters more than people realize. When you can hear yourself clearly while recording, you naturally adjust your distance, volume, and delivery. It’s like having a personal audio coach built into the mic.
The volume knob on the bottom of the mic controls the headphone output. It also doubles as the mic gain control when you press and hold it. Simple, but effective.
USB-C and XLR: Future-Proof Connectivity
The USB-C connection makes this a true plug-and-play device. No drivers, no interface, no setup. Plug it into your Mac, Windows PC, or even an iPad, and it’s recognized immediately. Record in OBS, Audacity, ScreenFlow, or whatever you use — it just works.
The XLR output on the bottom means you can upgrade to a professional interface (Focusrite Scarlett, Universal Audio Volt, etc.) later without buying a new mic. This dual connectivity is a smart play from Rode. You’re not locked into USB forever.
One annoyance: the USB-C port sits on the side of the mic near the mounting point. Depending on your boom arm, the cable can get pinched or bent at an awkward angle. It’s not a dealbreaker, but it’s worth noting — especially with right-angle boom arms. Use the included cable (it’s reasonably flexible) or pick up a cable with a 90-degree connector.
What I’d Improve
No microphone is perfect. Here’s where the Rode PodMic USB falls short:
No visual feedback. There’s no LED ring, no power indicator, no mute light. You can’t glance at the mic and confirm it’s live or muted. In a live session, that lack of visual confirmation is a real drawback. The Shure MV7+, by comparison, has a touch-sensitive mute panel with LED feedback.
Heavy. I mentioned this already, but it bears repeating. At 1.8 lbs, this mic will expose any weakness in your boom arm or desk mount. Budget accordingly.
Competes with the Shure MV7+. At around $200, the PodMic USB is only $20–30 less than the Shure MV7+ Review, which adds an LED touch panel, wider app support, and the Shure branding that some people prefer. The MV7+ doesn’t have onboard DSP in the same way, but its software suite is more mature. It’s a legitimate alternative worth considering.
Who Should Buy This Mic
The Rode PodMic USB is ideal for:
- Course creators who want broadcast-quality audio without a learning curve
- Podcasters who record in untreated rooms and need background noise rejection
- Live streamers who want zero-latency monitoring and onboard processing
- Anyone planning to upgrade to an XLR interface eventually
It’s not ideal if you need a lightweight portable mic, if you want visual feedback during live sessions, or if you’re on a tight boom arm budget.
Pricing and Value
The Rode PodMic USB typically sells for $199–$209 on Amazon. That’s a fair price for what you get — broadcast sound, metal construction, onboard DSP, and dual connectivity. It’s not the cheapest option (you can get a Fifine or Samson for under $80), but the audio quality and build put it in a different class entirely.
Compared to spending $300+ on a Shure SM7B plus a separate interface, the PodMic USB gets you 80–90% of that sound quality for a fraction of the total investment. And the onboard DSP alone saves hours of post-production time over the life of your course.
Final Verdict
The Rode PodMic USB is one of the best values in course creation audio right now. The sound quality punches well above its price, the onboard DSP is a genuine time-saver, and the all-metal build means it’ll last for years. The lack of visual feedback and the heavy weight are real tradeoffs, but neither is a dealbreaker if you set up your station correctly.
If you’re serious about the audio quality of your course content — and you should be, because bad audio kills student engagement faster than anything — this mic deserves a spot on your shortlist.
For more gear recommendations, browse the full Equipment section. And for the complete guide to recording great course audio — mic technique, room treatment, and editing workflows — see my free Record & Edit Audio Courses course.
Frequently Asked Questions
What is the built-in DSP?
Onboard Digital Signal Processing applies noise gate, compressor, and EQ directly on the microphone hardware via Rode Central app. Recordings come out polished with zero post-production.
Need an audio interface?
No. USB-C makes it plug-and-play with Mac, Windows, or iPad. It also has XLR output so you can upgrade to a professional interface later without buying a new mic.
Good for untreated rooms?
Yes. The dynamic capsule rejects room noise far better than condensers. Speaking 2-4 inches from the grill adds proximity effect for a professional, full sound without acoustic treatment.
How heavy and does it matter?
1.8 pounds of all-metal construction needs a sturdy boom arm like the Rode PSA1. It will sag on cheap desk stands. Budget for a proper boom arm.
Vs Shure MV7+ at similar price?
PodMic USB is $20-30 less, with the advantage of onboard DSP saving post-production time. Shure MV7+ offers an LED touch panel with mute feedback and more mature software.
You Might Also Like
Best Cameras for Online Courses (2026): From Webcam to Mirrorless
Your students will tolerate bad video. They won't tolerate bad audio. But good video sets you apart. Here's every camera option for course creators — from $80 webcams to $600 mirrorless.
Best Microphones for Online Courses (2026): USB, XLR, and Wireless
Bad audio kills more courses than bad video. I tested every microphone a course creator might need — from $50 budget picks to professional studio setups.
Best USB Microphones Under $100 for Course Creators (2026)
You don't need to spend $300 on a microphone to sound professional. Here are the best USB mics under $100 that will make your course audio clean and clear.